FlexConnect local authentication with WPA2-PSK

It is almost year 2015 and I was expecting that after 15+ years of wireless 802.11 technology, something like a static “password” for getting secure access to the wireless network is not common anymore. And ofcourse, I was wrong. There are still a lot of devices out there which handle a few (very old) EAP methods or don’t understand dot1X at all. That leaves us with the “pre-shared secret” methods and what if we want to use that at a branch office with a crappy connection to the datacenter / HQ?

Cisco’s FlexConnect with “local authentication” to the rescue! The network traffic is being directly bridged to switchport and when the access-point loses the connection to the WLC, clients will be local authenticated. There is a lot of documentation written about the supported EAP methods and how to configure them, but not for a pre-shared key scenario. So I configured it, tested it and it worked like expected. Curious that I’m, I enabled ssh on the access-point and searched for the pre-shared key in the running configuration. It was not there, so where does the access-point stores this information?

I found out that when I changed the pre-shared key on the WLC a file called “lwapp_non_apspecific_reap.cfg” is being updated on the flash of the access-point. I tried to read it and found out that between a lot of “empty” lines and random chars my SSID and profilenames where in that file in clear text, so my guess is that somewhere in those random chars my “encrypted” pre-shared key is being stored 🙂

Convert new access-points automatically to flexconnect mode

Lets say you have a bunch of new access-points who just joined your (v)WLC and you want them to be in flexconnect mode. With the GUI there is no other option than just manually set the mode on a per access-point bases and (pre 8.0) wait for them to reboot. Not any longer! There is a CLI command to do this automatically, so you can get of cup of coffee while this process is getting done…

(Cisco Controller) config>ap autoconvert flexconnect

I love automation… 😀

Default QoS (CoS) 802.1p values on a WLC and the IEEE/IETF standards

Right now I’m preparing for the 642-742 IUWVN (implementing Cisco Unified Wireless Voice Networks) exam. In all the learning material, you will find that the authors say that Cisco is using a confusing way of configure the QoS markings for bridging wireless traffic to the wired side. The issue is that when you configure the QoS profiles, the default 802.1p (CoS) values that will be shown are wrong if you follow the IEEE/IETF standards. The explanation from Cisco for this is that when you configure the QoS profiles, you work with the WMM user priority value and not the “real” 802.1p value. Very confusing if you ask me 😕 .

However. Since software 8.0 the previous described behavior got changed to match with the IEEE/IETF standards (see bug CSCui22330 for more information). So if you do an upgrade the values you supposed to use are wrong and you need to correct them to the “real” 802.1p values.

Cisco’s WLC AirOS 8.0 has been released!

Earlier today Cisco released a new software train for the AirOS based wireless lan controllers (WLC’s); the 8.0 train. For me the highlights for this software train are:

  • Increased scale to support up to 6000 clients on Cisco Virtual Wireless LAN Controller
  • Native IPv6 support
  • CleanAir Express on AP1600 (I will dedicate a blogpost on this subject in the near future)
  • Change the AP mode from local to flex-connect without a reboot, yay!
  • Configuring flashing AP LEDs from the GUI (Can be handy to identify that one access-point without a label or to annoy that person who has complains about the fact the the AP’s are not pretty enough to hang on the ceiling.. 😛 )
  • High Density deployment features:
    • Optimized Roaming
    • RSSI Low Check
    • RX-SOP

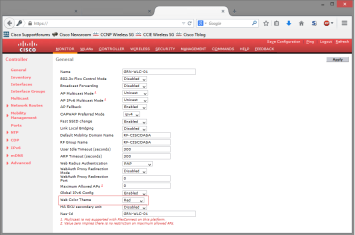
Oh and I don’t know who requested this particular feature, but you can from now on also use set a red Web Color Theme ..

Cisco WLC AirOS 8.0

I have to say that my experience with the now released version (8.0.100) on a 5508 WLC is that the code feels and acts a little buggy; not a release that you want to run in a production environment. My advice is to wait for a maintenance release, but it is always fun to test the new features in the lab 🙂 .

CCIE Wireless… we have a liftoff!

It started in my early years as a kid. I was curious about how stuff actually worked, especially radio technology had my interest. Two years ago I passed my CCNA Wireless certification and since than I did a few deployments with a lot learning on the job.

The problem with working for a relatively small Cisco partner is that you don’t have a real specialty; you need to know a lot about a lot. It is not that I do not like that. I love to do consulting, create designs and actually implement that firewall or Nexus solution. I do have my CCNP R/S and CCDP, but I always loved the wireless technology.

And now the moment is here. I scheduled all of the four CCNP Wireless exams four the next few months, every month a exam starting with the site survey one next Wednesday. The CCNP should give me a foundation for the CCIE. My plan is that I at least try the CCIE Wireless lab once before I turn 25 in September 2015. They say it is the hardest CCIE exam, I guess I will find out!

My plan is to read as much as possible on the Cisco Supportforums and blogs and by actually doing wireless projects. If I find something interesting I will write a blogpost about it. So, let’s start with my home lab:

The controllers
1x 5508
1x 2504
1x vWLC (not on the blueprint, but the technology is cool)

Access-points
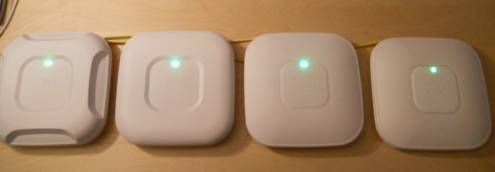
1x 3702I (with the WSSI module)
1x 2602I
1x 2602E (with some external antennas)
1x 3500I
1x 1242AG

Switches
1x 3650CG-12P
1x 3560-8PC

Phones
2x 7925G

For running WCS / Prime, MSE and ACS I have a VMware server collocated in a datacenter connected with a VPN on a ASA firewall.

It is not enough for CCIE, but it will be for CCNP and it is a nice start.. 🙂

Cisco CCNP / CCIE Wireless lab

External antenna and power levels in a Cisco wireless environment

Lets start this post with some theory about wireless and regulations for wireless networks. Here in Europe we have the ETSI who decides which frequencies you are allowed to use for wireless communications and with how much power you may send signals into the air.

For the 2.4Ghz frequencies (802.11b/g/n) this is 20dBm maximum EIRP which is the same as 100mW. For the 5Ghz frequencies (802.11a/n/ac) it depends on the actual channel you are using (for the UNII-1 and UNII-2 frequencies the maximum EIRP 23dBm, for UNII-2 extended this is 30dBm). The EIRP value is calculated as follows: transmitter power (dBm) – cable loss (dB) + amplifier (dB) + antenna gain (dBi).

Lets say you have a Cisco WLC, a Cisco 2602E-E access-point and you are going to use external antennas. How does that work and what do you need to configure so your deployment is legal?

For the Cisco 2602E-E access-point, the WLC calculates default a minimal 2dBi gain for 802.11b and 4dBi gain for 802.11a. This gives for 802.11b the following power levels:
(Cisco Controller) >show ap config 802.11b APb838.61b1.85a3
Tx Power
Num Of Supported Power Levels ............. 5
Tx Power Level 1 .......................... 18 dBm
Tx Power Level 2 .......................... 15 dBm
Tx Power Level 3 .......................... 12 dBm
Tx Power Level 4 .......................... 9 dBm
Tx Power Level 5 .......................... 6 dBm
Tx Power Configuration .................... AUTOMATIC
Current Tx Power Level .................... 1
Tx Power Assigned By ...................... TPC MAX Default

Lets say we are going to use a dual-band directional AIR-ANT2566P4W-R antenna. This antenna has 6dBi gain for both 2.4Ghz and 5Ghz, which is much higher than the default values and would give a too high EIRP value (18 dBm + 6 dBi = 24dBm). In this case we need to tell the WLC what the gain of this antenna is, so that it can lower the access-point power which ensures that the EIRP in no case is going to be too high.

On the GUI you can find this configuration under the tab “Wireless -> Access Points -> Radios -> 802.11a/n/ac / 802.11b/g/n -> click on configure for the correct radio -> Antenna Parameters -> Antenna Gain”. Please look below for a CLI example.

(Cisco Controller) >config 802.11a disable AP01
(Cisco Controller) >config 802.11b disable AP01
(Cisco Controller) >config 802.11a antenna extAntGain 12 AP01
(Cisco Controller) >config 802.11b antenna extAntGain 12 AP01
(Cisco Controller) >config 802.11a enable AP01
(Cisco Controller) >config 802.11b enable AP01

The value you are going to enter needs to be twice the size of the actual antenna gain! If you are running some extra cables between the antenna and the access-point, you can lower the gain value to compensate for that loss.

So now we configured the antenna gain, we can validate the the WLC did actually adjust the power levels:
(Cisco Controller) > show ap config 802.11b AP01
Tx Power
Num Of Supported Power Levels ............. 4
Tx Power Level 1 .......................... 13 dBm
Tx Power Level 2 .......................... 10 dBm
Tx Power Level 3 .......................... 7 dBm
Tx Power Level 4 .......................... 4 dBm
Tx Power Configuration .................... AUTOMATIC
Current Tx Power Level .................... 1
Tx Power Assigned By ...................... TPC MAX Default

The access-point power is (maximum) 13 dBm now + 6 dBi antenna gain gives a EIRP value of 19 dBi 🙂
Cisco AnyConnect slow authentication prompt

Last month I deployed a remote access VPN solution based on Cisco IOS routers with webvpn and Cisco’s AnyConnect client. After some basic tests everything looked good until someone with Windows 8.1 tried to make a connection. The user complained that it took at least 20 seconds before the authentication prompt appeared after making the initial connection. And guess what, the user was right! It was even worse -> also Android and iOS showed the same behavior.

So we fired up wireshark and looked at the packets to see what was going. We discovered that AnyConnect sends a client hello message using TLS 1.2, the IOS routers send a [FIN, ACK], terminating the session. AnyConnect eventually tries to connect using TLS 1.0, but that process took over 20 seconds to complete. So I contacted TAC and they filled a bug for this case (CSCun89616).

The good news is that Cisco fixed this bug with creating a new software release. The bad news is that at the this very moment there is not a software release out where bug CSCun89616 is fixed and the router does not crash when using webvpn because of bug CSCug17485… 🙁

So to make a long story short; if you are running into this issue you can’t fix it without giving up stability. I’m still in contact with TAC, so when there is a stable release where both bugs are fixed, I will update this post.

Update may: In IOS versions 15.3(3)M3 and 15.4(3)M both bugs should be fixed.

Cisco Prime Infrastructure import certificates made easy

Working with certificates time to time can be a little difficult, implementations differ and there are more than one certificate “formats”. This is also the case when it comes to importing a “pfx” archive to Cisco Prime Infrastructure (1.x or 2.x). If you search the web you will find a lot topics, but you will have to mix those together to get the job really done.

In this scenario you have a wildcard certificate and the private key combined together in a pfx archive (cert.pfx). You will need a openssl installation, the CA bundle (Root certificate and intermediates certificates, “CA-CERTS.CER”) which you can download from the certificate authorities website and these six steps:

1. Export the pfx archive to a standalone certificate and private key
openssl pkcs12 -in cert.pfx -nocerts -out key.pem
openssl pkcs12 -in cert.pfx -clcerts -nokeys -out cert.pem

2. Decrypt the private key
openssl rsa -in key.pem -out key2.pem
3. Convert certificate from pem to der format
openssl x509 -outform der -in cert.pem -out cert.der
4. Download the “CA-CERTS.CER”, “key2.pem” and “cert.der” files with FTP from the Prime CLI
5. Import the CA certs in Prime:
PRIME/admin# ncs key importcacert CA-CERTS CA-CERTS.cer repository defaultRepo
INFO: no staging url defined, using local space. rval:2
truststore used is /opt/CSCOlumos/conf/truststore
The NCS server is running
Changes will take affect on the next server restart
Importing certificate to trust store

6. Import certificate and private key
PRIME/admin# ncs key importkey key2.pem cert.der repository defaultRepo
INFO: no staging url defined, using local space. rval:2
truststore used is /opt/CSCOlumos/conf/truststore
The NCS server is running
Changes will take affect on the next server restart
Importing RSA key and matching certificate

7. Restart the NCS application, and drink a cup of coffee.. 😉
PRIME/admin# ncs stop
PRIME/admin# ncs start

Cisco AnyConnect VPN connected through a firewall

Most Cisco AnyConnect VPN configurations I see in the field, or have deployment myself, are terminated on a Cisco ASA firewall who is directly connected to the internet. However, in some bigger networks it is not uncommon to have another firewall in front of the remote access / VPN block in your network or to have an access-list on the routers in the internet edge.

Everybody knows the story about the biggest pro which the Cisco AnyConnect solution has if you compare it to the old IPSEC remote access based solution –> “it just works everywhere™”. That story is based on the fact that in most guest and mobile networks SSL network traffic (TCP/443) is allowed. This is true; AnyConnect will work fine if DNS is working and TCP port 443 is open. However, AnyConnect will try to use the DTLS protocol first which uses UDP port 443, if it fails than the client will fall back to use SSL for the transport of user data. The reason that AnyConnect prefers DTLS is that DTLS has less delay because of the connectionless nature of UDP and thus performance is better then with a SSL tunnel.

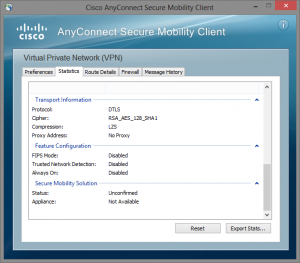
It is very easy to check if you are actually using DTLS in the AnyConnect client:

Cisco AnyConnect DTLSConclusion:
If you filter the network traffic destinate to a Cisco IOS webvpn router or Cisco ASA firewall in the remote access / VPN block in your network don’t forget to open UDP port 443 also.. 🙂